Jumat, 11 Mei 2012

Need For Speed Most Wanted 2 Siap Dirilis EA

Penggemar game balap tentu sudah tidak asing lagi dengan game Need For Speed besutan Electronic Arts (EA). Baru-baru ini dikabarkan bahwa EA akan meluncurkan sekuel terbaru game Need For Speed “Most Wanted 2”.
Need For Speed Most Wanted 2 merupakan video game balap yang dikembangkan EA Kanada dan diterbitkan oleh Electronic Arts. Most Wanted 2 sendiri merupakan seri kesembilan dari game Need for Speed.
Need For Speed Most Wanted 2 memiliki area balapan yang terorientasi dengan pilihan tertentu dari seri Need for Speed seri sebelumnya, yakni Underground. Need For Speed Most Wanted 2 sendiri dijadwalkan akan dirilis pada bulan Oktober 2012.

Kamis, 10 Mei 2012

Micron Akan Luncurkan RAM DDR4 Tahun Depan


Micron dikabarkan telah mengapalkan contoh dari tipe memori DDR4. Hal ini mengindikasikan bahwa RAM model terbaru tersebut kemungkinan besar sudah tersedia awal tahun depan.
Memori DDR4 kemungkinan besar akan muncul pertama kali di komputer desktop dan server baru kemudian kemungkinan juga akan muncul di Laptop, tablet dan perangkat portable lainnya.
Diharapkan DDR4  akan mengeluarkan daya 1,2 volt dibanding 1,5 volt pada DDR3. Bus speed akan dimulai pada 2133MHz. Memori baru ini didesain untuk memproses pembacaan, penulisan dan refresh lebih efisien dari DDR3.
Micron dikabarkan akan memulai produksi masal DDR4 pada akhir tahun ini, setelah Joint Electron Devices Engineering Council yang merupakan organisasi yang menetapkan standar memori menyelesaikan standar spesifikasi final untuk DDR4 beberapa bulan mendatang.

Minggu, 12 Februari 2012

Cara hack hotspot mikrotik


ShareThisNew
Selama beberapa bulan ini semakin banyak trik internet gratis yang menyebar luas lewat internet. Entah itu lewat mobile broadband atau membobol warnet hotspot yang sudah saya bahas. Tidak cukup itu saja, kali ini ada lagi trik internet gratis yaitu dengan membobol hotspot mikrotik. Sebenarnya cara ini sudah lama digunakan, tetapi karena baru saja saya praktekan maka saya tulis langkah-langkah membobol hotspot mikrotik-nya.

Pertama-tama, kita harus ingat biasanya kalau kita terhubung dengan hotspot mikrotik maka kita akan dihadapkan dengan menu mikrotik login sebelum kita bisa browsing. Biasanya ini terjadi di kampus-kampus yang menyediakan hotspot fakultas atau di kantor. Tentunya kala itu kita tidak berpikir bagaimana cara hack hotspot mikrotik tersebut.

Cara ini adalah untuk mem-by pass mikrotik login, sebenarnya lebih tepat kalau disebut cloning client. Intinya kita tidak harus login dulu untuk bisa browsing, karena target sudah login. Kita sebagai clone-nya jadi tidak perlu login. Trik ini hanya bisa jalan selama client yang kita clone masih terhubung ke hotspot.

Ini dia langkah-langkah membobol hotspot mikrotik :

1. Download Netcut terlebih dahulu, program ini untuk mengetahui MAC address yang terhubung dengan kita.
2. Koneksikan komputer kita dengan hotspot mikrotik
3. Jalankan program Netcut
4. Pilih LAN Card / NIC yang kita gunakan dengan mengklik menu Choice NetCard
hack bobol mikrotik hotspot images
5. Kemudian klik OK kembali ke layar utama, pilih salah satu network yang terkoneksi. Yang jelas bukan network kita atau network server.
hack bobol mikrotik hotspot images
6. Salin IP address dan MAC address, bisa juga dengan mengklik PrintTable kemudian blok dan copy paste ke notepad untuk langkah selanjutnya.
hack bobol mikrotik hotspot images
7. Setelah dipaste di notepad langkah selanjutnya edit nilai MAC address, pada contoh ini [00:26:5E:60:81:1C]. Hilangkan tanda [:] sehingga menjadi 00265E60811C. Nilai ini yang akan kita gunakan untuk merubah MAC address kita.

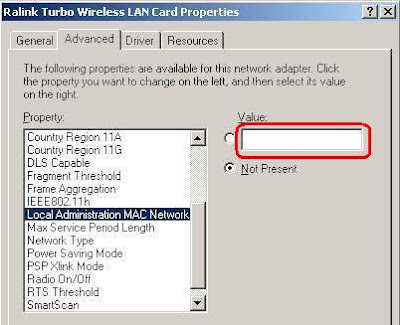
8. Selanjutnya kita disable dulu wireless LAN kita. Kemudian buka properties wireless LAN dan ubah nilai Local Administration MAC Network, default kosong. Isi dengan nilai tadi, pada contoh ini 00265E60811C
hack bobol mikrotik hotspot images
9. Kemudian kita set IP wireless LAN kita dengan IP yang sama yaitu 192.168.182.18 dan isi juga DNS server address.
Untuk DNS server address bisa dicek sebelum kita merubah MAC dan IP. Jadi waktu pertama kali kita terhubung ke hotspot, dengan cara mengetik perintah dari command prompt
C:\>ipconfig/all
hack bobol mikrotik hotspot images
10. Langkah terakhir adalah meng-enable kembali wireless LAN kita. Sekarang kita bisa browsing tanpa harus ijin pada yang punya hotspot.
11. Hasil :
Sebelum melakukan clone
hack bobol mikrotik hotspot imagesSesudah melakukan clone

Senin, 26 Desember 2011

Cara Memperbaiki Flashdisk yang Tidak Bisa Diformat

 | Mempunyai flashdisk yang rusak memang sangat menjengkelkan, apalagi didalamnya ada banyak data-data penting yang hanya ada di flashdisk itu saja tanpa ada back up-nya. Belum lagi ditambah HP yang rusak kena air, tapi untung ada cara memperbaiki HP yang rusak kena air. Dalam kesempatan kali ini saya akan sedikit memberi tips mengenai   Cara Memperbaiki Flashdisk yang Tidak Bisa Diformat  . Berikut langkah-langkahnya:

1. Masukkan dulu flashdisk ke dalam USB port yang ada di CPU.

2. Lalu klik start-run dan ketikkan “compmgmt.msc” (tanpa tanda petik).

3. Setelah itu maka akan muncul program bernama compmgmt, klik program tersebut.

4. Pilih storage yang berada di tengah setelah itu pilih disk management.

5. Disini biasanya flashdisk kalian akan terdeteksi, lalu di klik kanan dan pilih create partition.

6. Klik kanan lagi dan lalu pilih format, selesai.

Sampai disini biasanya Flashdisk kalian sudah bisa terformat, namun jika masih gagal juga silakan ikuti cara kedua dibawah ini.

1. Download software USB viewer di https://skydrive.live.com/?cid=21f12bb61b822dfa&id=21F12BB61B822DFA%21196, fungsinya untuk mencari VID dan PID, alias ID Vendor dan ID Product flash disk kita dengan cara melihatnya lewat software tersebut.

2. VID dan PID bisa dilihat di device connectednya, akan muncul Ox[PID] atau Ox[VID] seperti gambar di bawah ini:

Cara Memperbaiki Flashdisk yang Tidak Bisa Diformat

3. Lalu silakan kunjungi situs http://www.flashboot.ru/iflash.html

4. Masukkan data VID dan PID flashdisk kita di kotak yang telah disediakan dan klik tombol di sampingnya.

5. Maka akan muncul nama-nama Flashdisk beserta detailnya, cocokkan Flashdisk milik kalian.

6. Setelah mencocokkan, copy tulisan paling kanan dari detail Flashdisk kalian tersebut dan paste di kotak pencarian website tadi di pojok kanan atas.

7. Maka kalian akan disediakan link untuk mendownload software yang diperlukan.

8. Setelah mendownload dengan meng-klik tulisan Ckayatb (saya yakin cara menulisnya bukan seperti itu)

9. Ekstrak file dan buka, maka flashdisk kalian akan terdeteksi dan klik start.

10. Flashdisk kalian akan menjadi normal kembali.

Mungkin hanya itu cara memperbaiki flashdisk yang tidak bisa diformat, jika ada cara lain yang kalian tahu. Silakan ditambahkan di kotak komentar di bawah.

Sekian artikel ini mengenai   Cara Memperbaiki Flashdisk yang Tidak Bisa Diformat  , semoga bermanfaat dan selamat mencoba.

Mencari Keyword "Mahal" Untuk Situs Adsense Anda


Halo sobat-sobat Blog Paling Keren. Apa kabar? baik2 saja kan? Account adsense-nya belum di-banned kan? Hehehehehe...*kidding*

Ok deh, kali ini saya mau berbagi tentang bagaimana menentukan keyword yang "mahal". Maksudnya gini sob, sebagai pegiat adsense kita kan mau supaya CPC (Cost Per Click) nya gede. Artinya tiap iklan adsense yang tampil di blog kita diklik sama orang, pengennya sih langsung dibayar mahal gitu lho. Kalo bisa sih sekali klik langsung 10 dollar hahahaha.... :-)  (ngomong-ngomong, ada lho keyword yang semahal itu!)

Nah, gimana caranya kita bisa menentukan keyword mana yang "mahal" atau yang "murah"? Saya yakin sobat-sobat sudah sering baca di blog-blog para jagoan adsense yang memberi daftar sekian banyak keyword mahal. Salah satunya yang nge-trend itu "Mesothelioma" atau "Forex Trading" hahahahaha. Iya kan? Ngaku aja deh..... :-)

Tapi gak ada salahnya kan kalo kita survey sendiri? Dengan survey sendiri, kita jadi tahu keyword tersebut semahal apa, tingkat persaingannya bagaimana dan seberapa banyak orang yang mencarinya lewat search engine.

Ok...langsung aja ya. Gini nih..

Pertama-tama, buka https://adwords.google.com/select/KeywordToolExternal


Nah, tinggal ketik keyword yang kamu incar, misalnya kamu hobi foto dan pengen nge-blog tentang hobi kamu itu. Ketik "photography", jangan ketik "poto-poto" karena untuk ikutan adsense kamu harus bikin blog dalam bahasa inggris, bukan bahasa sunda. Kira-kira kayak gini :
Kalo sudah, klik "Get keyword ideas". Tidak lama kemudian akan muncul semua variabel yang berhubungan dengan keyword yang kamu ketik tadi.


Keterangan untuk masing-masing kolom adalah :

  • Advertiser Competition: Seberapa ketat persaingan kamu dengan situs lain untuk keyword yang ada di sebelah kiri. Semakin "hijau" semakin ketat persaingannya. Saran saya, kamu cari yang tidak terlalu ketat tapi tetap "mahal". 
  • Local Search Volume: Jumlah "search" atau pencarian pada bulan tertentu. Pada gambar di atas tertulis "December" berarti jumlah pencarian keyword tersebut pada bulan Desember. Kamu harus mencari keyword yang cukup banyak dicari orang.
  • Global Monthly Search Volume: Rata-rata pencarian setiap bulannya.

Nah, sekarang saatnya kita menentukan dari sekian banyak keyword yang berhubungan dengan "photography", yang mana yang rasional. Rasional gimana maksudnya? Ya...tergantung kamu. Tapi saran saya, kita cari keyword yang persaingannya tidak terlalu ketat, banyak dicari orang dan juga mahal. Caranya kamu klik dropdown "Choose columns to display" trus cari menu "Show Estimated Avg. CPC


Apaan tuh Avg. CPC? Avg. CPC atau Average CPC adalah rata-rata Cost per Click yaitu rata-rata harga per-klik dari keyword yang bersangkutan. Nah, akan tampil kolom baru yaitu kolom Estimated Avg. CPC seperti ini :
Angka-angka yang tertulis di bawah kolom Estimated Avg. CPC adalah "harga" per-klik dari keyword yang bersangkutan dalam rupiah. Nah, tugas kamu sekarang mencari keyword yang harga per-kliknya cukup mahal, persaingannya tidak terlalu ketat dan yang nyari banyak. Untuk mengurutkan harga dari yang terendah ke tertinggi atau sebaliknya, kamu tinggal klik tulisan (link) Estimated Avg. CPC itu.


Gambar diatas adalah contoh setelah diurutkan dari yang paling mahal ke paling murah. Seperti contoh di atas, keyword "photography education" adalah keyword yang paling mahal dengan rata-rata harga per-kliknya sebesar 53.163 rupiah atau sekitar 5 dollar sekali klik. Lumayan tuh...:-). Tapi sayangnya persaingannya cukup ketat dan yang nyari relatif sedikit (dilihat dari Global Monthly Search Volume). Berarti walaupun mahal, tapi kurang rasional untuk kita "tembak"

Sekarang tugas kamu tinggal mencari keyword-mu sendiri. Ingat untuk selalu mencari yang rasional. Selamat berburu keyword "mahal"!

Semoga sukses!

Selasa, 06 Desember 2011

Compare and contrast desktop and laptop components

Most of the functions that a desktop can perform can also be performed by a laptop. However, these two kinds of computers are built very differently and the parts are not interchangeable. As an example, a plane and a helicopter can each travel to the same destination, but they cannot be repaired with the same spare parts. This is also true for laptops and desktops. Few components can be shared between desktops and laptops.  
Desktop components tend to be standardized. They usually meet universal form factors. Desktops made by different manufacturers can often use the same components. A DVD/CD-RW drive is an example of a desktop component that has a standard form factor.  
Laptop components are much more specialized than desktop components. This difference is because laptop manufacturers focus on refining laptop components to make them more efficient and compact. As a result, manufacturers design laptop components to follow their own specific form factors. Laptop components are proprietary. As a result, you may not be able to use components made by one laptop manufacturer to repair a laptop made by another manufacturer.  
NOTE: Technicians may have to obtain certification for each laptop manufacturer that they support.  
After completing this section, you will meet these objectives:
  • Compare and contrast desktop and laptop motherboards.
  • Compare and contrast desktop and laptop processors.
  • Compare and contrast desktop and laptop power management.
  • Compare and contrast desktop and laptop expansion capabilities.

Compare and contrast desktop and laptop motherboards
 
Desktop motherboards have standard form factors. The standard size and shape allow motherboards from different manufacturers to be interchangeable.
Laptop motherboards vary by manufacturer and are proprietary. When you repair a laptop, it is strongly recommended that you obtain a replacement motherboard from the manufacturer of the laptop. Figure 1 shows a desktop motherboard and a laptop motherboard.

(images are displayed on the next occasion)

Laptop motherboards and desktop motherboards are designed differently. Components designed for a laptop generally cannot be used in a desktop.
Compare and contrast desktop and laptop processors
The central processing unit (CPU), or processor, is the brain of the computer. The CPU interprets and processes instructions that are used to manipulate data.
Laptop processors are designed to use less power and create less heat than desktop processors. As a result, laptop processors do not require cooling devices that are as large as those found in desktops. Laptop processors also use CPU throttling to modify the clock speed as needed to reduce power consumption and heat. This results in a slight decrease in performance. It also increases the lifespan of some components. These specially designed processors allow laptops to operate for a longer period of time when using a battery power source.
NOTE: Technicians should refer to the laptop manual for processors that can be used as replacement processors and for processor replacement instructions.
Compare and contrast desktop and laptop power management
Power management controls the flow of electricity to the components of a computer.
Desktops are usually set up in a location where they remain plugged into a power source. Desktop power management distributes electricity from the source to the components of the desktop. There is also a small battery in the desktop that provides electricity to maintain the internal clock and BIOS settings when the desktop is powered off.
Laptops are small and portable. This portability feature is achieved by combining the small size and weight of a laptop with the ability to operate from a battery. When the laptop is plugged in, laptop power management sends electricity from the AC power source to the laptop components. The laptop power management also recharges the battery. When the laptop is unplugged, laptop power management takes electricity from the battery and sends it to the laptop components.  
There are two methods of power management:
·         Advanced Power Management (APM)
·         Advanced Configuration and Power Interface (ACPI)
APM is an earlier version of power management. With APM, the BIOS was used to control the settings for power management.  
ACPI has replaced APM. ACPI offers additional power management features. With ACPI, the operating system controls power management.  
Compare and contrast desktop and laptop expansion capabilities
Expansion capabilities add functionality to a computer. Many expansion devices can be used with both laptops and desktops:
·         External drives
·         Modems
·         Network cards
·         Wireless adapters
·         Printers
·         Other peripherals
Expansion devices are attached to laptops and desktops differently. A desktop attaches these devices with serial, parallel, USB, and FireWire ports. A laptop attaches these devices with the same ports and PC Cards.
The standardized use of USB and FireWire ports makes it possible to connect many types of external components to laptops, docking stations, port replicators, and desktops. The USB and FireWire standards make it possible to connect and remove external components without the need to power off the system. USB and FireWire ports are used to connect a range of external components:
·         Printers
·         Scanners
·         Floppy disk drives
·         Mice
·         Cameras
·         Keyboards
·         Hard drives
·         Flash drives
·         Optical drives
·         MP3 players
Laptops and desktops have similar expansion capabilities. It is the difference in form factor between the computers that determines which type of expansion device is used. Desktops have internal bays that support 5.25″ and 3.5″ drives. Additionally, there is space to install other permanent expansion drives. Laptops have limited space; therefore, the expansion bays on laptops are designed to allow different types of drives to fit into the same bay. Drives are hot-swappable and are inserted or removed as needed.
Laptops use the PC Card slot to add functionality. The PC Card slot uses an open standard interface to connect to peripheral devices using the CardBus standard. Here are some examples of devices that connect using PC Cards:
·         Memory
·         Modems
·         Hard drives
·         Network cards
PC Cards follow the PCMCIA standard. They come in three types: Type I, Type II, and Type III. Each type of PC Card is different in size and can attach to different devices. A newer type of PC Card is called the PC ExpressCard. The PC ExpressCard comes in 34mm and 54mm widths

Selasa, 29 November 2011

10 KOMPUTER TERCEPAT DI DUNIA

1. JAGUAR


System Name : Jaguar
Site : Oak Ridge National Laboratory
System Family : Cray XT
System Model : Cray XT5-HE
Computer : Cray XT5-HE Opteron Six Core 2.6 GHz
Vendor : Cray Inc.
Application area : Not Specified
Installation Year : 2009
Operating System : Linux
Interconnect : Proprietary
Processor : AMD x86_64 Opteron Six Core 2600 MHz (10.4 GFlops)
Rmax : 1.759e+06 GFlops
2. ROADRUNNER

System Name : Roadrunner
Site : DOE/NNSA/LANL
System Family : IBM Cluster
System Model : BladeCenter QS22 Cluster
Computer : BladeCenter QS22/LS21 Cluster, PowerXCell 8i 3.2 Ghz / Opteron DC 1.8 GHz, Voltaire Infiniband
Vendor : IBM
Application area : Not Specified
Installation Year : 2009
Operating System : Linux
Interconnect : Infiniband
Processor : PowerXCell 8i 3200 MHz (12.8 GFlops)
Rmax : 1.042e+06 GFlops

3. Kraken XT5


System Name : Kraken XT5
Site : National Institute for Computational Sciences/University of Tennessee
System Family : Cray XT
System Model : Cray XT5-HE
Computer : Cray XT5-HE Opteron Six Core 2.6 GHz
Vendor : Cray Inc.
Application area : Research
Installation Year : 2009
Operating System : Linux
Interconnect : Proprietary
Processor : AMD x86_64 Opteron Six Core 2600 MHz (10.4 GFlops)
Rmax : 831700 GFlops


4. JUGENE

System Name : JUGENE
Site : Forschungszentrum Juelich (FZJ)
System Family : IBM BlueGene
System Model : BlueGene/P
Computer : Blue Gene/P Solution
Vendor : IBM
Application area : Research
Installation Year : 2009
Operating System : CNK/SLES 9
Interconnect : Proprietary
Processor : PowerPC 450 850 MHz (3.4 GFlops)
Rmax : 825500 GFlops

5. TIANHE-1

System Name : Tianhe-1
Site : National SuperComputer Center in Tianjin/NUDT
System Family : NUDT Cluster
System Model : NUDT TH-1 Cluster
Computer : NUDT TH-1 Cluster, Xeon E5540/E5450, ATI Radeon HD 4870 2, Infiniband
Vendor : NUDT
Application area : Research
Main Memory : 98304 GB
Installation Year : 2009
Operating System :Linux
Interconnect : Infinband DDR 4x
Processor : Intel EM64T Xeon E55xx (Nehalem-EP) 2530 MHz (10.12 GFlops)
Rmax : 563100 GFlops

6. PLEIADES

System Name : Pleiades
Site : NASA/Ames Research Center/NAS
System Family : SGI Altix
System Model : SGI Altix ICE 8200
Computer : SGI Altix ICE 8200EX, Xeon QC 3.0 GHz/Nehalem EP 2.93 Ghz
Vendor : SGI
Application area : Research
Main Memory : 74700 GB
Installation Year : 2009
Operating System : SLES10 + SGI ProPack 5
Memory : 74700 GB
Interconnect : Infiniband
Processor : Intel EM64T Xeon E54xx (Harpertown) 3000 MHz (12 GFlops)
Rmax 544300 Gflops

7. BLUEGENE/L

System Name : BlueGene/L
Site : DOE/NNSA/LLNL
System Family : IBM BlueGene
System Model : BlueGene/L
Computer : eServer Blue Gene Solution
Vendor : IBM
Application area : Not Specified
Main Memory : 73728 GB
Installation Year : 2007
Operating System : CNK/SLES 9
Interconnect : Proprietary
Processor : PowerPC 440 700 MHz (2.8 GFlops)
Rmax : 478200 GFlops

8. BLUEGENE/P

System Name : BlueGene/P
Site : Argonne National Laboratory
System Family : IBM BlueGene
System Model : BlueGene/P
Computer : Blue Gene/P Solution
Vendor : IBM
Application area : Research
Installation Year : 2007
Operating System : CNK/SLES 9
Interconnect : Proprietary
Processor : PowerPC 450 850 MHz (3.4 GFlops)
Rmax : 458611 GFlops

9. RANGER

System Name : Ranger
Site : Texas Advanced Computing Center/Univ. of Texas
System Family : Sun Blade System
System Model : Sun Blade x6420
Computer : SunBlade x6420, Opteron QC 2.3 Ghz, Infiniband
Vendor : Sun Microsystems
Application area : Not Specified
Main Memory : 125952 GB
Installation Year : 2008Operating System : Linux
Interconnect : Infiniband
Processor : AMD x86_64 Opteron Quad Core 2300 MHz (9.2 GFlops)
Rmax : 433200 GFlops

10. RED SKY

System Name : Red Sky
Site : Sandia National Laboratories / National Renewable Energy Laboratory
System Family : Sun Blade System
System Model : Sun Blade x6275
Computer : Sun Blade x6275, Xeon X55xx 2.93 Ghz, Infiniband
Vendor : Sun Microsystems
Application area : Research
Main Memory : 22104 GB
Installation Year : 2009
Operating System : CentOS
Interconnect : Infiniband
Processor : Intel EM64T Xeon X55xx (Nehalem-EP) 2930 MHz (11.72 GFlops)
Rmax : 423900 GFlops

Twitter Delicious Facebook Digg Stumbleupon Favorites More

 
Design by Panji Siregar | Blogger by Panji - Gamer TKJ | GAME IT'S MY LIFE